Putting together lip balm has been a frustrating task.
What I’ve tried:
1. Setting up lip tubes from Mann Lake on the counter and pouring the melted concoction in each tube with a beaker. The problems I encountered- a sloppy mess was created, containers were knocked over onto the counter, it took forever, and it created a sunken in look on the lip balm rather than an even pour.
2. Setting up lip tubes from Mann Lake on the counter and pouring in the melted concoction in each tube with a pipette. This resulted in fewer sloppy messes and fewer containers knocked over. The problems I encountered- it still took forever, I had to keep a close eye on the level of melted concoction and continuously squeeze in more to create an even look, pipettes had to be disposed of after only a couple uses due to wax solidifying inside of it.
3. Lip Balm Filling Tray from Bulk Apothecary. This was a genius idea which got me really excited. The problems I encountered- The Mann Lake tubes didn’t fit the tray, therefore I needed to order a new brand of tubes. I was advised to by Milliard brand.
4. Lip Balm Filling Tray from Bulk Apothecary and Milliard brand tubes from Amazon with Onlinelabels.com Lip Balm Labels.  These tubes fit the tray perfectly, which had me so excited. I was able to fill 50 tubes at once. You can overfill the tray to prevent the sunken in effect. Once it dries, you can use the scraper to remove excess wax and leave it with a perfect, even top. The labels fit perfectly. The problems I encountered- It left a tiny mess on the counter, the Milliard caps were a little too loose. Loose caps result in the lip balm easily getting a dirty film around the opening of the tube.
5. Milliard brand tubes from Amazon with Milliard brand lip balm blank labels. I purchased these labels because they have a tab that can help keep the cap on (at least before someone decides to use the lip balm). The problem I encountered- the label doesn’t wrap all the way around the lip balm tube. Like…what? I’d understand if they were different brands, but they aren’t. What a waste of money. Garbage.
6. Milliard brand tubes from Amazon. This batch of Milliard brand tubes had such loose caps, I contacted the company to complain. They sent me a free pack of 50 tubes and an apology. Hooray for nice customer service! The problem I encountered- The caps were still too loose. Even worse than the last batch. If I tipped the lip balm upside down, the caps would fall right off. Time to give up on this brand.
7. California Home Goods Lip Balm Crafting Kit and Onlinelabels.com Tamper Evident Tab Lip Balm Labels. A new pouring tray from Amazon that came with 50 tubes. I read reviews from other people that said that most tubes would fit this tray. The 50 tubes it came with fit perfectly, with only 2 or 3 loose caps. My new tamper evident lip balm labels are also awesome. The problem I encountered- California Home Goods does not sell lip balm containers separate from this kit and they brag that all standard sized tubes should fit. I purchased more from Amazon and hoped for the best.
8. 25 Lip Balm Containers – Empty Tubes sold by Pure Acres Farm on Amazon. I haven’t poured any lip balm into this yet. Why not? The problems I encountered- It does not fit either the California Home Goods tray OR the Bulk Apothecary tray. I will try rubber banding them all together and trying the pipette method again with these, but I won’t be purchasing this brand again.
9. Premium Vials, Empty Lip Balm Containers on Amazon- To be updated upon arrival.
Interesting fact (opinion): I confidently recommend onlinelabels.com for labels.


 Do not let the 3rd box, our honey super, fool you into thinking that this one is doing well. This hive was once thriving and full of jerks, but it is now struggling to survive. While I was in there, I saw a queen emerge from a supercedure queen cell. Some of the worker bees noticed this happening and decided to get in there and murder her. Selfishly defying nature, I gently pushed away the worker bees so I could watch the queen. She climbed down the frame, where I’m sure the murder was completed. This hive has a whole lot going on that is all wrong. There are spotty worker cell frames in places where they shouldn’t be. There are several queen cups all over the place. I might downsize them to a nuc box if they don’t get it together soon.
 While hive #1 couldn’t stop swarming, we decided to try hive splitting. We took one of the many frames with a capped queen cell, a few frames of worker bees, and some empty frames, and threw them in one of these boxes. We were pretty sure this was going to be a failure, but figured it couldn’t hurt to try. You may not be able to tell from the photo, but these boxes can only fit 5 frames, where our other hives fit 8. They are really working hard to fill up the second box. I plan to leave them alone until I treat them for mites.
 Ignore the crooked hive cover. These girls were mad at me for messing with them. Dan was stung twice, and I was stung once. I figured I best adjust that cover once they calm down. These are the bees who swarmed between 2 fences back in May. They appear to be doing really well right now. I do not expect to be taking any honey from them this year, but hopefully they will make it through the winter and be awesome for us next season.
 This is what we call success. I harvested a ton of wax from them, and gladly saw that our first honey super is 90% finished with capped honey. They are working hard on the second one.
 First you take the beeswax and you shred it. You shred it. You shred it, shred it, shred it! This isn’t easy. It might look like it is as easy as shredding cheese in this picture, but it actually feels like you are shredding a brick.
 Next, you mix in some of the oils with the beeswax, and you melt it in a double boiler until it is pure liquid. If you are feeling risky, you don’t have to use a double boiler. However, if you aren’t careful, and it actually starts boiling, hot oil shooting out at you can not only be painful, but also a serious pain to clean up. We’ve done that before, and it wasn’t pretty.
 We’ve tried several methods of pouring this hot concoction into lip balm tubes. With some 6th grade students, we tried using a beaker from science class. We tried using a teeny tiny funnel that was special ordered. Both of these ideas were effective but messy. Finally we discovered the beauty of little disposable pipettes. We also found this cool contraption you see on top of the lip balm containers. This holds them all in place so that they can cool down easily without accidentally knocking them over while being clumsy.
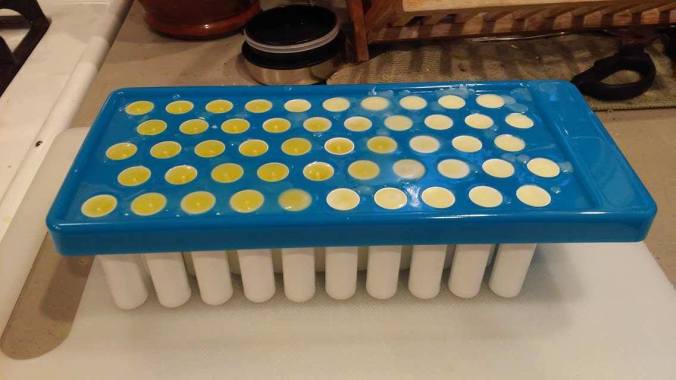 After it dries, we cap and label them. Then we sell them for $3.00 each, or 2 for $5.00 if we are feeling saucy.


